Hancitor

This blogpost will teach you how to analyze the banking malware known as Hancitor and also teach you how to unpack packed malware.

Initial Triage


SHA256 Hash - 8ff43b6ddf6243bd5ee073f9987920fa223809f589d151d7e438fd8cc08ce292

File Type - Dll

Initial Triage Using Cutter -

  • The Dll is written in C and has four library imports -

    • kernel32.dll

    • user32.dll

    • gdi32.dll

    • mpr.dll

  • The low number of library imports suggests that this file is most definitely packed. But before performing any unpacking, we need to confirm if this file is malicious or not. We can do this using Virus Total.

  • The virus total result comes out as positive. So this Dll is definitely malicious and by the looks of it, seems to come from Hancitor family.

  • Now that we know that this DLL is malicious, we can start static analysis on it. This can be done using FLOSS.exe.

  • Some interesting strings from the string dump are -

Unpacking


  • Let's look at the malware in PE-Bear now to get some more information.

  • We can see that the malware only has 4 imports in the Import Address Table (IAT) and the imports aren't related to networking or cryptography. So, the DLL is most likely packed. Below are the exported functions of the DLL.

  • Using pestudio tool, we can see that there is a difference between the raw-size and the virtual size of the .data section of the DLL. So this confirms our suspicion that the DLL malware is packed.

  • Now that we know that the DLL is a packed malware, we can use x32DBG to unpack it and analyze the contents underneath.

  • The malware has five exported functions and without further static analysis, it's difficult to know what they do. Thus we can go one by one to figure out what they do. Let's start with the first one - "Callrun".

  • When the execution is stopped at the start of execution (INT3 OPCODE), set up breakpoints (ctrl + G to search the function up and after it comes up, click on the small dot on the left of the assembly instruction) on

    • VirtualAlloc

    • VirtualProtect

    • ResumeThread

    • WriteProcessMemory

  • These are some classical WinAPIs that are used in unpacking process. Now run the program (F9) until it hits the first breakpoint (VirtualAlloc). Now Right click on the EAX register and follow it in Dump 1. You can see the memory contents of the adress being pointed to by EAX.

  • As you can see, the memory dump starts with a magic byte "MZ" which denotes that it is a Windows PE program. But this isn't what we need right now. Now Click on Execute till Return (CTRL+F9) to see what the VirtualAlloc function allocates. To see what the function returns, repeat the same process of right-clicking on the EAX register -> Follow in Dump. This memory dump will soon get filled when the next VirtualAlloc function runs (run the program until it hits the breakpoint at the VirtualAlloc function again).

At the Return Point of First VirtualAlloc
When the second VirtualAlloc runs
  • This memory data is still gibberish to us. So we need to repeat the same process again and again while visualizing the return data in different dumps to make sense of this gibberish data.

If the malware is unpacking very slowly, you can Singleshot the memory dumps. In order to do that, go to the dump that is going to be written on by the next VirtualAlloc function call, select the first four hex bytes, right click β†’ Breakpoint β†’ Memory, Write β†’ Singleshot. This helps in cases where malware takes a long time to write on that region

Second VirtualAlloc return address
That address gets written on by the third calling of the VirtualAlloc function
Third VirtualAlloc return Address
Which gets overwritten by the time VirtualProtect is called
  • In this specific strain of Hancitor, it took three VirtualAlloc calls to fully place the unpacked malware in memory. It can vary depending on the strain of Hancitor. In the above picture, at the start of Dump 3, we can see the ASCII characters "M8Z". Just like the magic bytes of Windows PEs, "M8Z" is the magic byte of PLib Compression. We can dump this whole region by right-clicking on the bytes and choosing "Follow in Memory Map".

  • On the gray highlighted base address, right-click -> Dump Memory to File to save the memory region of the unpacked malware. Keep the debugger open for now. Open the saved file in XVI Editor. This is essential to fix the IAT of the dumped malware. Now in XVI editor, search for the text string - "DOS".

  • Once you found it, look for the PE magic bytes "MZ" 2-3 lines above. Click on the byte just before it and go to Edit β†’ Delete to cursor. This will align the packed malware's PE headers.

Before editing
After editing
  • Save the hex data to disk and open it in Pe-Bear to see the imports. We can now see all the imports of the malware.

  • By the looks of it, the malware potentially uses "WININET.dll" for some kind of network communication. To know which kind of network communication, we need to further analyze the malware in a disassembler. I will be using Binary Ninja and Ghidra for the task. You can close the debugger for now.

Static Analysis


  • We can start analyzing the malware by looking at the exported functions. You can see the exported functions of the dll below as seen in Ghidra.

  • There are 2 exported functions -

    • entry

    • MVELLJHNDSVBJLD (I renamed it to MAL_MAIN later)

  • The entry (or the DllEntryPoint) function supposedly only returns the value 1 and exits. So it's not useful for us.

Callgraph in Binja
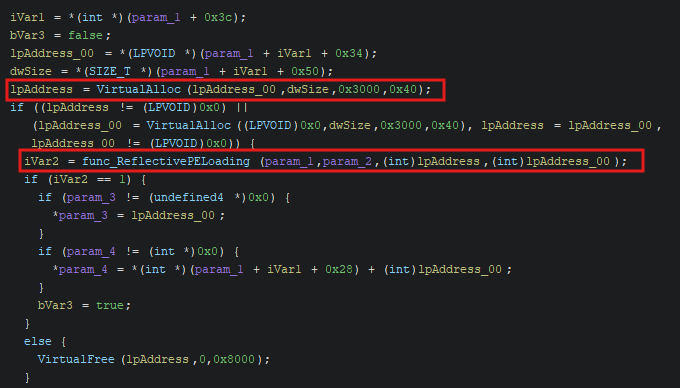
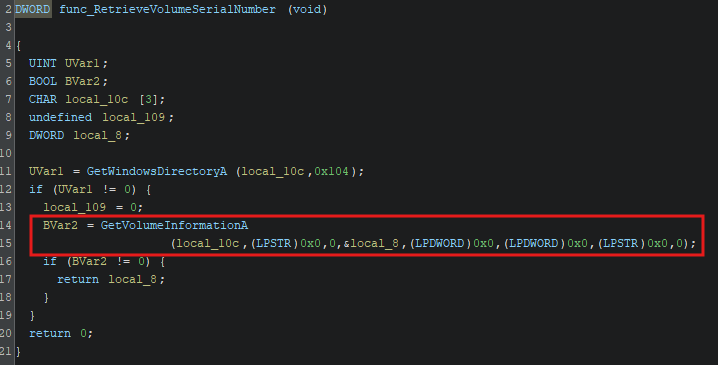
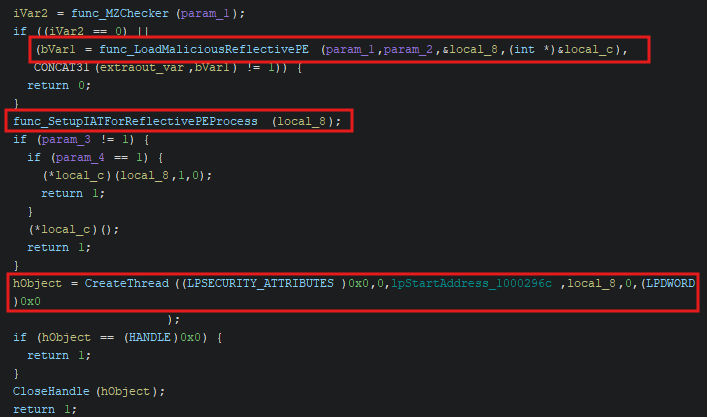
Decompiled code as seen in Ghidra

The other function - MAL_MAIN seems interesting though. It supposedly compares a data variable "MainCompareWithValue0" with the value "0x0". If they are not equal, then the function returns. Else, it calls "FirstFunctionCalledFromMain" and sets the variable to "1".

All function and variable names are renamed for brevity. The full reverse source code is available here.

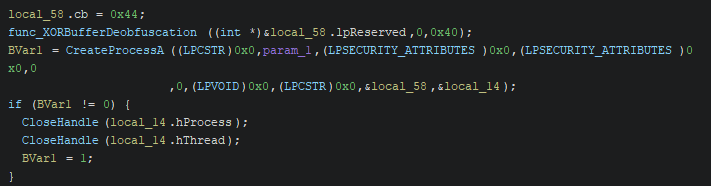
Decompiled MAL_MAIN function
  • The "FirstFunctionCalledFromMain" function does the following -

    • Create a GUID for the victim

    • Initialize C2 communication and send victim information to C2

    • Download and inject shellcode as -

      • Remote injection

      • Self Injection

      • Launching Shellcode

      • Download file to temp directory

Creating A GUID For The Victim

  • In order to distinguish the victim computer from others, Hancitor creates a unique GUID (Global Unique Identifier) for the machine. This is done by concatenating various unique values from the victim system.

  • First Hancitor uses GetAdapterAddresses winapi to get the MAC (Media Access Control) addresses of all the network adapters on the pc. Then it XORs all the addresses together to get a final 48-bit value.

XOR-ing all the MAC addresses
XOR implementation
  • After this, Hancitor extracts the machine volume serial number using GetVolumeInformationA and XORs it with the above final MAC value.

  • Next, this malware also gets the machine information by calling GetComputerNameA . Hancitor also finds the username of the logged-in user by searching for the PID of "explorer.exe", extracting the user SID (Security Identifier) from the process token using OpenProcessToken and GetTokenInformation, and looking that SID up through LookupAccountSidA winapi.

  • Finally the machine info is formatted as -

  • In order to get the public-facing IPV4 address of the victim machine, Hancitor requests a GET request to hxxp://api[.]ipify[.]org. In case it's unable to get a response, Hancitor uses 0.0.0.0 as the IPV4 address.

Get Public IPV4 address Of Victim
How The GET Request is sent
  • This GET request function is also later used to download shellcode from the C2.

  • The domain shares and NETBIOS names are extracted using DsEnumerateDomainTrustsA Winapi.

  • Finally before sending the values back to the C2, Hancitor encrypts them using RC4 and formats them as below -

Initialize C2 communication and send victim information to C2

  • After the victim data is completed and encrypted, the malware runs an infinite loop to communicate with the C2 server. To send information to the server, Hancitor uses POST HTTP requests. The code is the same as that of downloading the shellcode.

  • As the C2 servers are long down, we can't do a PCAP analysis of the communications but looking at the code, the C2 sends a BASE64 string to hancitor. Hancitor checks the first 4 bytes of the response to verify if the response is from the C2 server.

  • After the check, the result is decoded using Base64 and accepted. The C2 response contains a CLI argument which is tokenized (using a custom implementation of strtok C++ function) and checked to determine which type of payload execution method is to be used.

  • Here are the possible commands given to Hancitor -

    • b - Download and remote injection of shellcode

    • e - Download and self injection of shellcode

    • l - Download shellcode and use Svchost to launch it

    • r - Download Shellcode in temp folder and execute it

    • n - Do Nothing

Download And Remote Injection Of Shellcode

  • Hancitor downloads the file from the URL in the response and performs remote reflective PE injection to execute it.

  • The malware first parses the response using pipes as delimiters and downloads the file contents. After receiving them, Hancitor validates the UNC path and goes forward with the payload processing. After processing, it checks the magic byte of the processed payload to check if it is a "MZ" (Windows PE) or not.

  • In order to process the payload, the malware decrypts it using a XOR cipher with its first 8 bytes as the key. Next, it calls RtlDecompressBuffer to perform LZ decompression to decompress the final executable.

  • Next up, it performs reflective PE injection by injecting the downloaded payload into a svchost.exe process.

  • How the reflective injection works is, first a suspended svchost.exe process is created for the payload to be injected in. That is done by getting the SystemRoot variable (C drive) using GetEnvironmentVariableA winapi, adding "\System32\svchost.exe" to it and creating it is suspended mode using CreateProcessA.

  • Next, Hancitor uses VirtualAllocEx to create a buffer in target memory for the injection. The Payload is copied to a heap buffer created using HeapAlloc and mapped to it through relocating it's PE base. Finally WriteProcessMemory is used to write the payload from the heap to svchost’s allocated memory.

  • Now that the payload is set to the suspended "svchost.exe" process, Hancitor sets up the injected thread’s context by setting the image base address from PEB (through the context’s EBX register) to the injected base address and the thread’s entry point (through the context’s EAX register) to the injected entry point. Finally the payload is launched by calling ResumeThread.

Download and self injection of shellcode

  • When given the e command, Hancitor downloads a file from the URL in the response and injects it into its own process.

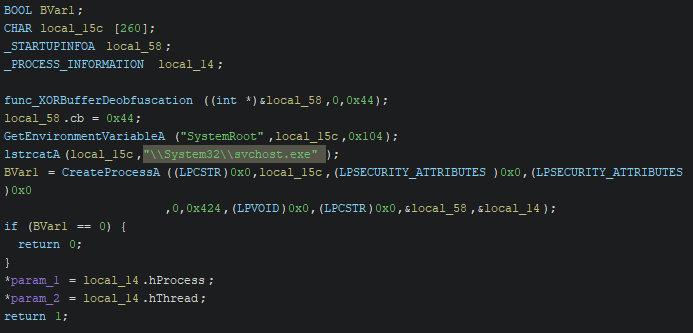
The whole self injection process
  • After payload download, the malware checks if the download payload is a Windows PE or not. After that, it calls VirtualAlloc to allocate a buffer and loads the payload there.

  • Now, the malware set's up the IAT for the reflective self injection. This is done by extracting all imported DLL names and calling GetModuleHandleA or LoadLibraryA to retrieve the DLL’s base. For each imported DLL, the malware manually iterates through its own Import Address Table (IAT) to retrieve the name of each imported function. It calls GetProcAddress to get the address of the imported function and updates it in its IAT.

  • Lastly, the malware creates a new thread using CreateThread and launches the payload in it.

Download shellcode and use Svchost to launch it

  • Hancitor downloads the shellcode from the URL in the C2 response and runs it either locally or in svchost.

  • This function takes in a parameter to determine whether the shellcode is injected locally or in svchost. The process of injecting to svchost is same as earlier and the shellcode is launched using CreateRemoteThread winapi.

  • Injecting locally works the same as before - memory is allocated using VirtualAlloc, shellcode is copied into this buffer and finally executed using CreateThread.

Download Shellcode in temp folder and execute it

  • Lastly, when r is given, Hancitor downloads a file from the URL specified in the response, drops it in the Windows Temp folder, and launches it.

  • Hancitor gets the temp folder location using the GetTempPathA winapi and GetTempFileNameA to generate a temporary file’s name in that path with the prefix of β€œBN”.

  • Then it calls CreateFileA and WriteFile to write the downloaded content to the temporary file.

  • After that, the malware checks the Characteristics flag in the file header to determine if the payload is a PE or a DLL. If the file is an executable, it's launched by calling CreateProcessA with the file’s path as the command line to be executed.

  • If the file is a DLL, the malware launches it by calling CreateProcessA with a formatted rundll32.exe command as the command line.

  • The analysis of Hancitor is now complete. The yara detection rules for this malware are below.

YARA Rule


Last updated